Sunday, March 21, 2010

The Coat's Progress

I've decided that seeing the frock coat on a hanger is simply not enough, for my sartorial or photographic purposes. Because of the way it's cut, especially in the front, it tends to hang with the fronts wide open and flaring out from top to bottom in a way that makes it resemble a rather ill-fitting A-line dress. Or a tent. But never fear! Last night I remembered and subsequently unearthed my old custom dress form (made from a large t-shirt and copious amounts of duct tape), and proceeded to drape the dress coat on it and take copious amounts of pictures of the project finally starting to come together.


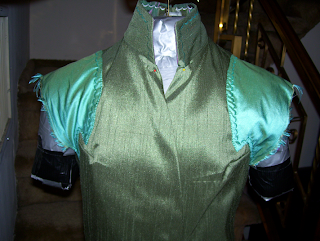
Oh, and I noticed that in my other pictures I haven't shown the coat with the collar attached. Here it is, notice the fancy machine embroidery. (And on the "epaulets".)


Epaulets and color-coordinated back vent buttons, from the back.


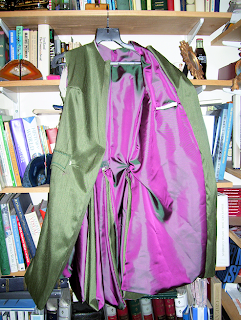
Pinned up one of the skirts to show the lining in its iridescent glory. Despite possible matters of "taste," I think the blue, green, and purple work well together. It might not seem like an ideal color combination, but I like it.


Some of the photos are a bit washed-out. I'll edit them properly once I have the whole thing finished.

Next up: Adding sleeves and buttons, and handsewing whatever else needs to be handsewn.

Saturday, March 20, 2010

Busy, but look, I found some sleeves!

I still haven't gotten around to taking pictures of my latest work on the frock coat, but that's perfectly alright as I haven't even posted all the old ones.

Here's one from when I had the sleeves on, before I ripped them off for reasons explained in a previous post.
Note the disproportionately large sleeves, and one cuff.


I remember having some trouble figuring out to sew skirts so they would lie flat in the back and look as elegant as they're supposed to. The pattern wasn't incredibly specific on that point, as on many other points, but I found a way to make it work rather nicely. Since I knew I wouldn't want to add a button to the middle vent (no matter how much my mother suggests it - sometimes enlisting your mom as your assistant has its ups and downs), I handstitched that vent closed to hide the raw edges, and I think that looks quite good as well.


Behold, I iron things! In this case, I think I was pressing the skirts flat after sewing the lining to the outer material. Stan and his peewee hockey team seem shocked by my iron -- or maybe by my aged sewing machine barely visible in the lower right corner.

Friday, March 12, 2010

Frock Coat update

More on my steady project, the sage shantung frock coat.

(Sadly, I didn't get any pictures of it with the sleeves on.)


Let's see what I've got so far.
  • All 3 materials (outer material, lining, interlining) pinned and cut
  • All major pieces sewn together
  • Sleeves, cuffs, collars, pocket flaps sewn together
  • Outer material body sewn to lining body
  • Heaps and heaps and heaps of ironing 
  • Collar basted onto coat
  • Cuff linings handstitched to sleeves
  • Inside pocket done - correctly! (It wasn't in the pattern and  I managed it with the lining already sewn to the outer material, hence the pride)


That's almost the entire coat, divided up into disproportionately important bullet points. Here's what's left.
  • Handstitch lining to cover collar seam
  • Sew sleeves on
  • Hand-sew sleeve linings to cover sleeve seams
  • Finish self-covering buttons
  • Sew on the buttons, buttonholes, trim, etc.


Seems pretty easy, pretty straightforward.

Yet again, it isn't, quite.

I'm 99% sure I did not change the length of the seam that runs from collar to shoulder (connecting the front & back pieces) from the pattern measurements. However, after trying the thing on with the sleeves basted (and then sewn at 1.5 stitch length... Ugh, the seam ripping!), it was obvious that something went horribly wrong somewhere. I've got admittedly broad shoulders, but the smallest pattern size is about a men's small (or a bit bigger), which should be a very generous fit on me. Still, the coat's a bit tight in the back, across the shoulderblades, and I'm convinced, in one of my spasms of ultra-girlishness, that the high shoulder seams do annoying things to the shape of my arms.

I think I just want an excuse to add a bit more of my own style to the coat. Hopped out to Mood on Tuesday to get some more fabric, and through a twist of fate involving fortuitous pricing, I ended up with 3/4 yd of genuine silk shantung! It's iridescent blue that shines a green that matches the coat's outer material, and I'm going to use it to make a panel on each shoulder that'll give me more space to move around as well as adding a very welcome bit of extra color to the coat. I want it to be versatile, and function as a modern coat or a slightly avant-garde period piece.
Above: A hastily-pinned test run of what the shoulder inserts might look like. I used the swatches of material I got when I was choosing the color of the coat. If there'd been enough material there - I even basted one side to be sure - I would have used these. And if I could have afforded a second color of shantung I would have bought that as well, I love the look of the two opposing colors, and could have had a lot of fun with color schemes and buttons. As it is, I think I have to re-cover a few I've already done, the idea of shimmery blueish-green accent buttons is too spectacular to pass up.

More pictures to follow!

Tuesday, March 9, 2010

Fabric!

Real silk shantung. Yum.


So, the frock coat ended up too tight across the back and too short from collar to shoulder seam. What's a girl to do but add shiny epaulets, then? I wanted to use the same material I used for the rest of the coat outer fabric in a complimentary color, but Mood only sells it by the yard, no fractions. That would normally work fine, but this particular fabric is 110" wide and $25 a yard. It worked perfectly for the rest of the coat (3 yards was easily enough to make a coat for a slender, 5'1" woman), but I couldn't justify spending another $25 to get the 20" square of fabric I needed -- though I know I'd use the rest of the fabric eventually, I don't have $25 to toss out right now. Well, not for this.

The helpful salesbloke at Mood told me that, although this poly-shantung only goes by the yard, they have real shantung (at $14/yd) upstairs that they'll sell by the half-yard, and they might have something in a similar color to the poly I was asking about. I trot myself upstairs, and what do I find?


Genuine silk shantung, $14 a yard, and it's an iridescent weave of the exact blue I was looking for, and a green that's unbelievably close to the color of the coat outer material when the light hits it. There's the common thread (literally, oh aren't I a witty one?) I've been looking for, this will tie together the epaulets and lining, I was worried that whatever blue I used would make the lining look more random than I intended it to.
It turns out there's only 3/4 yd. on the roll, so another wonderful salesbloke gives it to me for $7. I love that store!


And speaking of Mood love, I found  two great fabrics in their overflowing upholstery remnants bin downstairs.
I plan to use this one to make a messenger bag capable of holding numerous scores and also allowing me to run without having to clutch its strap, which is an annoying problem I have with my current stock of shoulder bags and tote bags. The fabric is a thick, almost-velvety upholstery jacquard that would look perfect covering a chair, settee, or other luxurious seating apparatus. I'll sketch some bag designs and probably post them here eventually. I want the satchel to look good hanging across my frock coat, as well as at a steampunk convention or going to see an opera, and I already have some ideas in my head. Hardware, but not too much, and some modern angles without making the fabric look inconsistent with the style. I'm looking forward to this project so much!


Then we have the "Rustic Toile" (so it calls itself on the selvages). (Aren't I a fancy fabric, knowing my own name?) It's a sturdy cotton, with blue 18th-century-esque vignettes on a white background.

I'm going to make this into a sort of catch-all for my important items that have to move from bag to bag as often as my whim dictates. It'll be replacing my current catch-all, a little grey backpack that I think was meant to be a camera case. It functions, but it has a lot of unnecessary padding (to protect a camera) and hardware (zippers, lobster clips, handle, etc.), and the pockets could be arranged more efficiently to save space in my bags. As with the jacquard, I have some ideas of what I want it to do and how I want it to look, and once I've got something going I'll upload a few more pictures. I might also use the toile to line the jacquard bag, if I have enough left over.
I leave you with some pretty toile vignettes to contemplate: