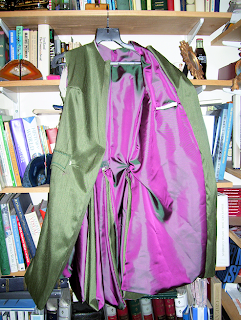
More on my steady project, the sage shantung frock coat.
(Sadly, I didn't get any pictures of it with the sleeves on.)
Let's see what I've got so far.
- All 3 materials (outer material, lining, interlining) pinned and cut
- All major pieces sewn together
- Sleeves, cuffs, collars, pocket flaps sewn together
- Outer material body sewn to lining body
- Heaps and heaps and heaps of ironing
- Collar basted onto coat
- Cuff linings handstitched to sleeves
- Inside pocket done - correctly! (It wasn't in the pattern and I managed it with the lining already sewn to the outer material, hence the pride)
- Handstitch lining to cover collar seam
- Sew sleeves on
- Hand-sew sleeve linings to cover sleeve seams
- Finish self-covering buttons
- Sew on the buttons, buttonholes, trim, etc.
Seems pretty easy, pretty straightforward.
Yet again, it isn't, quite.
I'm 99% sure I did not change the length of the seam that runs from collar to shoulder (connecting the front & back pieces) from the pattern measurements. However, after trying the thing on with the sleeves basted (and then sewn at 1.5 stitch length... Ugh, the seam ripping!), it was obvious that something went horribly wrong somewhere. I've got admittedly broad shoulders, but the smallest pattern size is about a men's small (or a bit bigger), which should be a very generous fit on me. Still, the coat's a bit tight in the back, across the shoulderblades, and I'm convinced, in one of my spasms of ultra-girlishness, that the high shoulder seams do annoying things to the shape of my arms.
I think I just want an excuse to add a bit more of my own style to the coat. Hopped out to Mood on Tuesday to get some more fabric, and through a twist of fate involving fortuitous pricing, I ended up with 3/4 yd of genuine silk shantung! It's iridescent blue that shines a green that matches the coat's outer material, and I'm going to use it to make a panel on each shoulder that'll give me more space to move around as well as adding a very welcome bit of extra color to the coat. I want it to be versatile, and function as a modern coat or a slightly avant-garde period piece.
Above: A hastily-pinned test run of what the shoulder inserts might look like. I used the swatches of material I got when I was choosing the color of the coat. If there'd been enough material there - I even basted one side to be sure - I would have used these. And if I could have afforded a second color of shantung I would have bought that as well, I love the look of the two opposing colors, and could have had a lot of fun with color schemes and buttons. As it is, I think I have to re-cover a few I've already done, the idea of shimmery blueish-green accent buttons is too spectacular to pass up.
More pictures to follow!


No comments:
Post a Comment