Showing posts with label costume. Show all posts

Sunday, November 14, 2010

Opera update

The only downside of Rigoletto was that it left me almost no time for costuming. Not to mention my Monday chorus group, Tuesday workshop/rehearsals, production of Die Fledermaus that I just got into (yay!) that rehearses 3-4 nights a week, and ~13 hours a week of tedious day-jobbing.


Not much time for costuming, once you factor in the fact that I really do need more sleep than I've been getting. I've already cut ballet and one concert from my schedule (the concert conflicted with opening night of Fledermaus; ballet conflicted with sleep). I'm not used to having to learn so much new material at once. The Monday chorus is pretty easy, but any music is pretty easy to learn when there's no blocking to go with it and you're surrounded by people singing the same part that you are. The real trick was Fledermaus (I'd been listening to it in Deutsch, and we're doing it in English - d'oh!), and the Tuesday opera workshop. I'm singing an aria that I thankfully have performed before, Susanna in the "Canzonetta sull'aria" scene and duet from Mozart's Le Nozze di Figaro, Sophie in "Bonjour grande soeur... Ah! Le rire est beni... Des larmes qu'on ne pleure pas..." (and whatever else is included in that scene) from Massenet's Werther, and the Second Spirit in the "Bald prangt... Du also bist" trio and quartet from Mozart's Die Zauberflote. If two of those pieces weren't Mozart, I swear I'd be done for!


How does this fit into my costume blog, you may ask? That's the thing. My main interest is opera (though if anything happened to my voice, costuming would be my next career choice), so lately I've been thinking I need an outlet for opera rants more than costume chats. 
As of now, my blog is officially dual-purpose! (Cue fanfares) 
I hope the costumers find my opera posts interesting, and vice versa. The way I do things, I keep opera and sewing pretty closely related. One of the things I love about opera is being able to wear the wonderful costumes and take regular trips back in time to the 18th century. I'd also like to find more people interested in opera to casually chat with - I'm hoping this blog might aid my search for a kindred mind or two. 


There may be a few design changes around here to accommodate the shift in focus. Nothing major - it's not a major shift, since the blog was already leaning heavily in an operatic direction.


I'm hoping the official change to an opera and costume blog will also inspire me to post more regularly. I miss writing when I've been away for it from a while.


Yours musically,
Allegra

Monday, August 30, 2010

One thing at a time: Subito RenFaire!

Now the Fringe play is over and done with, I can shift my focus back to my main areas of interest: opera and costumes!


My voice is skipping happily along as it usually does, which is especially good since rehearsals for this fall's production of Rigoletto have begun!

I get to be tossed around by a few principals during the first act, and then dropped on the floor in a comical manner and forgotten about. I'm learning many interesting facts about royal courts in the 1600s, when our production is set. Men like the Duke of Mantua could decide to have an orgy to celebrate Tuesday, and the diritto feudale (ou le droit de seigneur) was in its prime, so with relative ease the Duke could treat said orgy as a feast for every sense, in every sense, as he'd already had a good deal of fun with most of the women in attendance. For the sheer novelty of it, now seems as good a time as any to seduce your jester's virginal daughter, no?

Anyway, I'm getting a bit carried away with the prose, here. The ball scene in Act I will be played as a masked ball, and I've decided to help develop my chorusey character by purchasing my own mask to match the costume I've been fitted for (alas, I've had no time to make my own). I've been thinking of adding lace or tulle around the top for a bit of extra flair (the character would like it so), but that might carry it over the top. I'll experiment with it.

The erstwhile corset of last July is still in production, but at the second to last step! I only have to add the bias tape and grommets, and it's ready to debut. Not a moment too soon, either. This Labor Day weekend, the yearly party I attend will be renaissance-themed. After singing an aria for the group two weeks ago that was received unimaginably well, I feel like I'm on a roll. I'd love for my costume to make a good impression. Also, I find deadlines to be a wonderful incentives to finish something quickly.


It's reversible!

I'm going to modify the design slightly, and combine two separate Simplicity patterns to make a fully-boned corset with detachable "sleeves." Everything will lace together with grommets, and interchangeable with other pieces made from the same or similar patterns, in case I want to do something more "harlequin" in the future.

I'm aiming to design an entire outfit that will be ready to wear to the faire in Tuxedo, NY before it closes, which I think will be on Sept. 20th. I planned to make the corset (with straps/sleeves), a matching skirt, and possibly a simple blouse if I can't find a cheap one. While wandering around the garment district today, however, I was forced to change my plans when I encountered a gorgeous, 1.5yd remnant of dark green wool crepe. There wasn't enough for a full cape, but it's perfect for a capelet, maybe even one with a hood (if I can figure those blasted things out).

So, a list of my costume pieces:
- Capelet (green, woolly)
- Corset (sleeves optional)
- Skirt (to match corset)
- Leather bracers (with the aid of grommets)
- Leggings (I think I have a pair somewhere)
- Boots (fancy, leather, waterproof, already mine)
- Jewellery (to be crafted)
- Belt (made of tassels) (More on that later.)
- Small satchel (to coordinate with the belt, possibly out of the green wool)

I think that's the largest single costuming task I've ever set for myself, or bothered to plan ahead of time. Gasp! I think I stand a chance of finishing it all, which would be fantastic for so many reasons. I'd always thought of doing something baroque first, but a Renaissance/Medieval woman of a generally unsavory character (part pirate, part cutpurse) is a fine first step into semi-serious costuming.

Monday, July 5, 2010

Huzzah!

I just confirmed with my two closest friends that they would not be opposed to my sewing them into uncomfortable costumes and us all running around in a giant park doing random improv. This may well mean I immerse myself once more in the thick of costuming, or this may turn out to be another wild idea that doesn't come to fruition. Either way, life's looking particularly benissimo right now.

"It's only a flesh wound...

...I'm not dead yet!"
Still here, still costuming, though I've been feeling decidedly detached from life in general lately. Since I'm 99% sure that nobody from my current job knows the URL for this blog, or even knows that I make costumes in my spare time, I think I can say here that it feels like work has been gorging itself on heaps of my time lately, even though I know I don't work that many hours a week. This job is so far removed from my ultimate goals in life in just about every way, I don't think it's a huge secret that, although I do the best work that I possibly can while I'm there because I was raised (by karate) with the mindset that slacking off should be physically impossible, I'm only there because it pays for my vocal lessons and a bit of fabric and nice togs on the side. 


But back A good friend of mine just sent me (cross-country!) some lovely green fabric with gold stripes. I think it's acetate, but it looks like jacquard, which makes it the perfect candidate for:
My first corset! I need to purchase the fancy bit of machinery that puts in eyelets for you, but I think I know where to find it. Aside from the eyelets and lacing (also easy to obtain), I have everything I need. Main fabric, check; lining/reversible main fabric, check; leftover interfacing from frock coat, check. Oh, duh, I just remembered (silly, forgetful me) that corsets need boning as well. I'm going for the tried-and-true modern whalebone substitute: thick cable ties. I hope the interfacing I have is thick enough to hold its shape with the "bones" in, but if it's not, at least I won't be wasting any expensive fabrics. I do hope it stays together, though. I love the way the striped fabric looks even when I can only see the different cutout pattern pieces lying flat together on the cutting board.


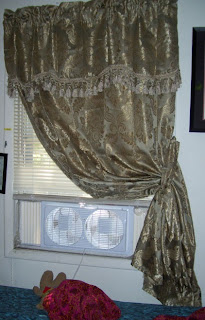
And a quick room design update: 


As  I keep adding things to the room, more pictures of things will be added to the blog. I desperately want to paint soon, hopefully I'll be up for that once the AC is fixed. 
(Painting + 90-degree weather = not the good)

Sunday, May 30, 2010

Until I can secure a French Baroque estate for myself, this will have to do.

I have a flair for opulent, French Baroque-type interior design, with a color palette taken partly from that period but mostly from my continued, semi-subconscious favoring of modern goth style. When we moved into my current house, I was given the larger of the two non-master bedrooms. It's a plus for space, and at least it isn't covered with obnoxiously 80's wallpaper, but I swear my room has the worst carpet in the house.

See for yourself here, see also the rolls of fancy paper which I plan to turn into elegant wall art and possibly use to wrap around and cover things like frustratingly modern pencil cases.

Within the last 2 years or so my style has shifted drastically from modern (bold colors, simple shapes) to baroque/Victorian/1700s (jewel tones, flowing lines, and ubiquitous floral patterns), which is why this vintage tea cart I found at a vintage furniture consignment warehouse is holding my jewellery in things from the Container Store.

Did I mention that the walls in my room are stark white? That makes them easy to paint over, but horribly boring until I do. Here's a dramatic sample I painted behind one of my Venetian carnival masks. I'm hoping it will go on more evenly, and perhaps even look a bit darker, once I start on the real paint job using a roller.

Little pillows I bought from Ikea years ago, during my first, modern redecoration. I used scraps of old curtain fabric from the living room, which had a custom made set of gorgeous, sweeping drapes until my roommates got to them and decided they collected too much dust. I might try to make drapes for my window out of the remaining fabric, once I finish the other major things I have to get done in the space.
(Also, that tiny cube in blue floral fabric was once one of a set of fuzzy foam dashboard dice I bought on a whim - why waste the foam? The other die awaits re-covering.)


Fancy frame that I previously found way too feminine, but now fits my style very well. Nothing wrong with a bit of femininity.
You may note that in the frame is a photo from Forbes Life magazine of a few months ago.
It's a peach frock coat by Sete-Cento, an Italian couturier. Just by looking at the name you should have some idea of how much I love this company. I didn't find this image until I'd already started on my frock coat, but from now on I'll use this style of design as my inspiration.


This was supposed to be about interior design, but I can't stop my mind wandering back to costuming. I want to make a pair of stays or corset next, either in plain linen or with an outer covering of green fake-shantung leftover from my frock coat. Another idea I'm longing to get to before the summer is over is an odd mix of frock coat, jacket, and light summer dress in a white cotton knit that would keep me cool in the summer while staying true to my oddly nostalgic fashion sense. More on all of this when life allows.

Monday, May 10, 2010

Silken swirls of gorgeous Shantung


So the swirls aren't really done in the shantung, but I think I could have had you fooled, couldn't I? The color matches so perfectly. I found this thin cording - $0.59/yd! - tucked away in a corner of M&J Trimmings in Manhattan. M&J is a great resource for anyone in the area, I highly recommend them!

As for the coat, here's more of the pictures I promised weeks, possibly months ago.


The design on the front pleases me very much, I think I'll have to add some more around the bottom of the coat and coiling up along the back vents before I can say this coat is truly "finished." I should hurry, though, as it feels tight across the shoulders even with the inserts I added. Damn this wide, operatic ribcage! (But not really - I value my singing over my ability to fit into this coat when it comes down to it.) The worst case scenario is that I would sell the coat on Etsy for some ridiculous sum. Maybe the sum wouldn't be so ridiculous, it is a very fine coat if I do say so m'self.
In the meantime, I'll try and find an opportunity to wear it that won't involve floral pajamas and late night sewing/photography sessions.


Friday, April 30, 2010

Why yes, I do dabble in many, many things

Including jewellery-making, when the urge strikes.
While looking around Pearl Paint for my felt, I happened upon a wonderful green cameo in a metal setting that looks like pewter or slightly tarnished silver, and a package of nine transparant, plumbbob-shaped purple beads with wonderfully intricate end caps and wire loops at either one end or both. The combination of these two things demanded to be made into a necklace, so I bought the cameo and the set of beads for around $7 total. As I hunted in the basement for my pliers, which I'd need to fasten the purple beads to my chain, I unearthed a few unexpectedly wonderful things. Most importantly and unexpectedly, a pair of metal hoops with vinelike loops for attaching earring hooks and dangly beads. I'd had them tucked away for ages without finding any good use for, and they match the design on the cameo setting extraordinarily well. I also discovered a few more modern-looking beads in the same shade of green as the cameo, a ribbon, my trusty  needle-nose and flat-tip pliers, and enough silver head and eye pins to attach everything together. Before the night was over, I had designed and created an updated Victorian necklace and earring set, which I love. (Especially after seeing it in photographs!)
The green ribbon and cameo can easily be removed from the silver chain without having to remove the purple beads or even use a pliers, so if I ever need to adapt it to more period-correct costuming, it won't be a problem at all.

I can't remember the last time I was this pleased with jewellery I made. I think I've worn it every day since I made it.

Thursday, April 29, 2010

Make that, "I tip my fancily adorned hat to you."

Hooray!

Inspired by House of Nines design, I made my first cockade tonight to go with my felt tricorne-in-the-making. I bought the ribbon at M&J Trimmings, in Manhattan. It cost about $7 total for a yard of each, which seems very reasonable considering what the ribbons became. Next time (now that I know there will be a next time), I'll try two yards, and go for a fuller cockade. The button in the center was originally meant for the frock coat, until I started using the shantung. The color works quite well with the rest of the cockade, and I somehow prefer this simple, self-covered button to one of the fancier ones available. I'll save fancy for later.
Finishing the entire cockade took approximately 4 hours.

Until the hat is finished, meaning until Pearl Paint restocks my large pieces of felt, the cockade will have to content itself with being stuck onto bags and the occasional lapel.

Oh, and an added bonus...
... It matches the frock coat very well. (Better than this picture makes it seem.)

Monday, April 26, 2010

I tip my hat to you...

Or I would, if it had a brim.
I embarked on making a tricorne a few weeks ago, and its production is now stalled because Pearl Paint has my felt out of stock, and doesn't expect more for a few weeks. I've made the crown though, which in my opinion looks pretty good for a first attempt at haberdashery.


Here's my "hat block." Adapting some online instructions, I measured the circumference of my head, then padded a mixing bowl with paper towels til it had the same measurement. Tape the towels to each other and to the bowl every once in a while to stop your "block" from changing shape, and then cover the whole thing in plastic wrap when it's the right size. For good measure tape the plastic wrap down too.

Here's where I made a substantial mistake - instead of stretching the felt and pinning it, I for some reason thought one could pull the felt down a bit and brush it into a domed shape, agitating the material to make it shrink and re-form as a favorite wool sweater that shrinks in the wash. Maybe my felt wasn't high enough quality ($5 for a 1yd x 2yds piece), or maybe brushing for shape is simply a bad idea. Either way, I realized after a few days of brushing (bordering on over-brushing) that I had to re-check my source.
The hat looks quite good above, because I was stretching it without intending to. All the excess felt around the edges is stuffed inside the crown and down into the glass that acted as my stand.

Before confirming the instructions, I experimented with hat styles:
I'm still unsure whether I'll end up with a traditional tricorne or with some more modern variation. It'll be easier to tell once I get my brim piece on.


I ended up taking the felt off, rewetting it and stretching it over the block as nature intended. The only problem with using a pyrex bowl other than a styrofoam wig rest (other than the lack of it having a stand) (I used a tall but sturdy drinking glass) is that you bend quite a few pins before you figure out what angles are safe to stab at with relatively frail bits of metal.

The result:
A hat squid.

More on the hat later, and its accessory.

Sunday, March 21, 2010

The Coat's Progress

I've decided that seeing the frock coat on a hanger is simply not enough, for my sartorial or photographic purposes. Because of the way it's cut, especially in the front, it tends to hang with the fronts wide open and flaring out from top to bottom in a way that makes it resemble a rather ill-fitting A-line dress. Or a tent. But never fear! Last night I remembered and subsequently unearthed my old custom dress form (made from a large t-shirt and copious amounts of duct tape), and proceeded to drape the dress coat on it and take copious amounts of pictures of the project finally starting to come together.


Oh, and I noticed that in my other pictures I haven't shown the coat with the collar attached. Here it is, notice the fancy machine embroidery. (And on the "epaulets".)


Epaulets and color-coordinated back vent buttons, from the back.


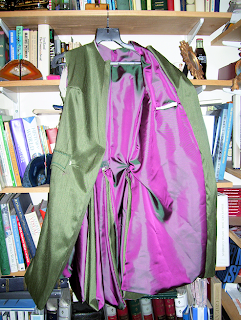
Pinned up one of the skirts to show the lining in its iridescent glory. Despite possible matters of "taste," I think the blue, green, and purple work well together. It might not seem like an ideal color combination, but I like it.


Some of the photos are a bit washed-out. I'll edit them properly once I have the whole thing finished.

Next up: Adding sleeves and buttons, and handsewing whatever else needs to be handsewn.

Saturday, March 20, 2010

Busy, but look, I found some sleeves!

I still haven't gotten around to taking pictures of my latest work on the frock coat, but that's perfectly alright as I haven't even posted all the old ones.

Here's one from when I had the sleeves on, before I ripped them off for reasons explained in a previous post.
Note the disproportionately large sleeves, and one cuff.


I remember having some trouble figuring out to sew skirts so they would lie flat in the back and look as elegant as they're supposed to. The pattern wasn't incredibly specific on that point, as on many other points, but I found a way to make it work rather nicely. Since I knew I wouldn't want to add a button to the middle vent (no matter how much my mother suggests it - sometimes enlisting your mom as your assistant has its ups and downs), I handstitched that vent closed to hide the raw edges, and I think that looks quite good as well.


Behold, I iron things! In this case, I think I was pressing the skirts flat after sewing the lining to the outer material. Stan and his peewee hockey team seem shocked by my iron -- or maybe by my aged sewing machine barely visible in the lower right corner.

Friday, March 12, 2010

Frock Coat update

More on my steady project, the sage shantung frock coat.

(Sadly, I didn't get any pictures of it with the sleeves on.)


Let's see what I've got so far.
  • All 3 materials (outer material, lining, interlining) pinned and cut
  • All major pieces sewn together
  • Sleeves, cuffs, collars, pocket flaps sewn together
  • Outer material body sewn to lining body
  • Heaps and heaps and heaps of ironing 
  • Collar basted onto coat
  • Cuff linings handstitched to sleeves
  • Inside pocket done - correctly! (It wasn't in the pattern and  I managed it with the lining already sewn to the outer material, hence the pride)


That's almost the entire coat, divided up into disproportionately important bullet points. Here's what's left.
  • Handstitch lining to cover collar seam
  • Sew sleeves on
  • Hand-sew sleeve linings to cover sleeve seams
  • Finish self-covering buttons
  • Sew on the buttons, buttonholes, trim, etc.


Seems pretty easy, pretty straightforward.

Yet again, it isn't, quite.

I'm 99% sure I did not change the length of the seam that runs from collar to shoulder (connecting the front & back pieces) from the pattern measurements. However, after trying the thing on with the sleeves basted (and then sewn at 1.5 stitch length... Ugh, the seam ripping!), it was obvious that something went horribly wrong somewhere. I've got admittedly broad shoulders, but the smallest pattern size is about a men's small (or a bit bigger), which should be a very generous fit on me. Still, the coat's a bit tight in the back, across the shoulderblades, and I'm convinced, in one of my spasms of ultra-girlishness, that the high shoulder seams do annoying things to the shape of my arms.

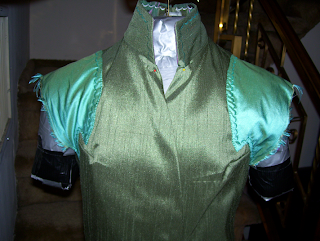
I think I just want an excuse to add a bit more of my own style to the coat. Hopped out to Mood on Tuesday to get some more fabric, and through a twist of fate involving fortuitous pricing, I ended up with 3/4 yd of genuine silk shantung! It's iridescent blue that shines a green that matches the coat's outer material, and I'm going to use it to make a panel on each shoulder that'll give me more space to move around as well as adding a very welcome bit of extra color to the coat. I want it to be versatile, and function as a modern coat or a slightly avant-garde period piece.
Above: A hastily-pinned test run of what the shoulder inserts might look like. I used the swatches of material I got when I was choosing the color of the coat. If there'd been enough material there - I even basted one side to be sure - I would have used these. And if I could have afforded a second color of shantung I would have bought that as well, I love the look of the two opposing colors, and could have had a lot of fun with color schemes and buttons. As it is, I think I have to re-cover a few I've already done, the idea of shimmery blueish-green accent buttons is too spectacular to pass up.

More pictures to follow!

Tuesday, March 9, 2010

Fabric!

Real silk shantung. Yum.


So, the frock coat ended up too tight across the back and too short from collar to shoulder seam. What's a girl to do but add shiny epaulets, then? I wanted to use the same material I used for the rest of the coat outer fabric in a complimentary color, but Mood only sells it by the yard, no fractions. That would normally work fine, but this particular fabric is 110" wide and $25 a yard. It worked perfectly for the rest of the coat (3 yards was easily enough to make a coat for a slender, 5'1" woman), but I couldn't justify spending another $25 to get the 20" square of fabric I needed -- though I know I'd use the rest of the fabric eventually, I don't have $25 to toss out right now. Well, not for this.

The helpful salesbloke at Mood told me that, although this poly-shantung only goes by the yard, they have real shantung (at $14/yd) upstairs that they'll sell by the half-yard, and they might have something in a similar color to the poly I was asking about. I trot myself upstairs, and what do I find?


Genuine silk shantung, $14 a yard, and it's an iridescent weave of the exact blue I was looking for, and a green that's unbelievably close to the color of the coat outer material when the light hits it. There's the common thread (literally, oh aren't I a witty one?) I've been looking for, this will tie together the epaulets and lining, I was worried that whatever blue I used would make the lining look more random than I intended it to.
It turns out there's only 3/4 yd. on the roll, so another wonderful salesbloke gives it to me for $7. I love that store!


And speaking of Mood love, I found  two great fabrics in their overflowing upholstery remnants bin downstairs.
I plan to use this one to make a messenger bag capable of holding numerous scores and also allowing me to run without having to clutch its strap, which is an annoying problem I have with my current stock of shoulder bags and tote bags. The fabric is a thick, almost-velvety upholstery jacquard that would look perfect covering a chair, settee, or other luxurious seating apparatus. I'll sketch some bag designs and probably post them here eventually. I want the satchel to look good hanging across my frock coat, as well as at a steampunk convention or going to see an opera, and I already have some ideas in my head. Hardware, but not too much, and some modern angles without making the fabric look inconsistent with the style. I'm looking forward to this project so much!


Then we have the "Rustic Toile" (so it calls itself on the selvages). (Aren't I a fancy fabric, knowing my own name?) It's a sturdy cotton, with blue 18th-century-esque vignettes on a white background.

I'm going to make this into a sort of catch-all for my important items that have to move from bag to bag as often as my whim dictates. It'll be replacing my current catch-all, a little grey backpack that I think was meant to be a camera case. It functions, but it has a lot of unnecessary padding (to protect a camera) and hardware (zippers, lobster clips, handle, etc.), and the pockets could be arranged more efficiently to save space in my bags. As with the jacquard, I have some ideas of what I want it to do and how I want it to look, and once I've got something going I'll upload a few more pictures. I might also use the toile to line the jacquard bag, if I have enough left over.
I leave you with some pretty toile vignettes to contemplate: